How to Replace a Doorbell Button – a Fast and Easy DIY Project
Sometimes the smallest details make a huge statement. Take your doorbell push, for case. Does it expect squeamish? Does it make visitors want to band it? Does it reflect your way? Does information technology even function? If you answered "no" to any of those questions, it'due south fourth dimension to swap out your old, sorry doorbell for a new ane. This is one of the easiest and least expensive ways to bandbox upwardly your home's forepart entrance. Even with some wrinkles thrown in (such as a strange doorbell placement and some odd rock formations), this project will exist fast and leaving you lot wondering why it took you ten years to brand the change.
 View in gallery
 DIY Level: Beginner
 View in gallery
 Take 1 last look at your sometime, yucky doorbell button. This item one had been painted on. Information technology was missing a spiral and therefore glued into place on one side. It was plastic and soul-less. Information technology was time to motion information technology up and out.
 View in gallery
 Brainstorm past removing your old doorbell button. Unscrew the front screws.
 View in gallery
 You volition come across that your doorbell is connected past 2 business firm wires. Normally when we work with any kind of wiring in the home, you'll want to flip the breaker to plow those hot wires off. This is non necessary when replacing a doorbell button, nevertheless, because of the very depression voltage flowing through the wires.
 View in gallery
 One challenge of doing any sort of upgrades on a rock face up front end entrance is the unevenness of the rock/concrete grout, particularly over time. This doorbell is probably thirty+ years quondam, and the physical betwixt the rocks has cracked, including one side nether the doorbell where a screw should've held it in identify.
 View in gallery
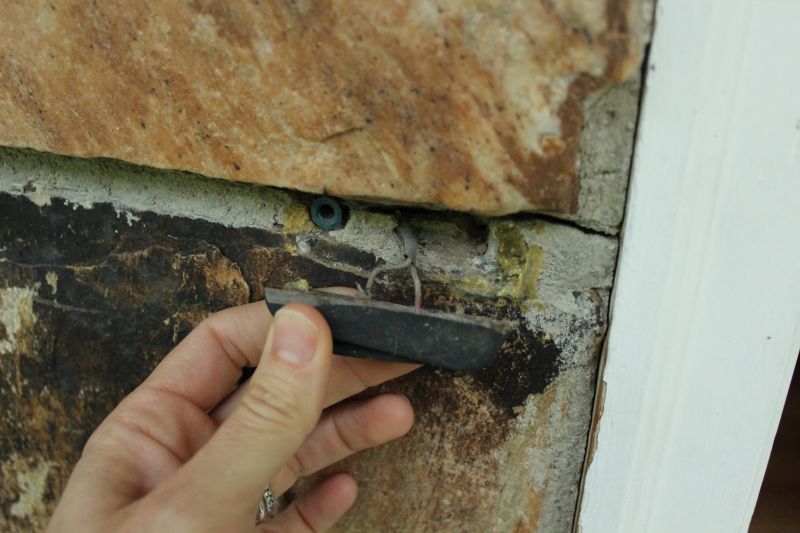
 I scraped out loose bits of concrete from this hole simply didn't worry too much about it at this indicate because we'll be filling the gap a bit later.
 View in gallery
 Unscrew the old doorbell button by loosening the two screws underneath and removing the two wire connections.
 View in gallery
 You should still take easy access to both wires later on the doorbell button is removed.
 View in gallery
 Determine the doorbell push you lot similar. I chose this one for its unproblematic design and round push button; however, some of its features ended up existence a detriment to this particular doorbell push button bandy. You'll see why.
 View in gallery
 Curve the ends of the two doorbell wires into small "hooks." These will get under the screws on the new doorbell push.
 View in gallery
 Place the two hooks nether the screws on the back of the new doorbell push button. This item doorbell push protrudes deeply into its wall placement; because of the circular button, the screws are very close together.
 View in gallery
 Tighten the ii wire-holding screws.
 View in gallery
 Brand sure the wires don't impact each other when tightened down under the screws. If they practise, yous'll exist hearing a lot of mis-fired doorbell chimes.
 View in gallery
 Probably, if you don't accept a rock face up wall, y'all volition be able to merely screw your new doorbell push button back into place and exist washed with the thing. Easy, correct? Still, if you're dealing with a situation on the stone wall such as broad open up spaces where the screws are supposed to become, you'll need to come up with a solution. The doorbell placement in this instance is rather stock-still, because the wires come out between the rocks. So we need to add substance where at that place is, currently, none. Enter: rock putty.
 View in gallery
 Mix up a bit of rock putty powder in a pocket-sized dispensable container, and as carefully as you can, fill the spaces where the doorbell push mounting screws volition go. Take care to leave infinite if your doorbell button sticks out in the back. And practise all you tin to proceed the wires free, or they'll be rather cemented into place after the stone putty hardens.
 View in gallery
 Pull out some carbide-tipped drill bits if in that location's a chance you lot would exist drilling into rock, brick, stone, or cement. You'll also likely need a hammer drill or a power drill with a hammer feature.
 View in gallery
 Let the rock putty dry thoroughly, then carefully drill your screw holes. Chances are, you can just slap on your mounting screws and be done with the thing hither. Congratulations! However, despite this DIY project being quite unproblematic in theory, I ran into a problem with the doorbell push itself. Afterwards it was mounted, I pressed it to attempt it out. (Should've done that at the beginning.) The button stayed pushed in, with no normal button-kickback. Rats. I uninstalled the faulty doorbell button and returned it for a different model.
 View in gallery
 The new model was narrower (to fit more snugly against the protruding upper rock edge in this particular instance), smaller, outwardly protruding (to avoid squeezing back between the rock putty sections), and, possibly nigh importantly, a workable button. Perfect.
 View in gallery
 I was able to hands tighten the screws to install the new doorbell button.
 View in gallery
 Then carefully scrap and wipe off any backlog stone putty.
 View in gallery
 Due to the uneven (read: non-flat) surface that is a stone face wall, there will likely be gaps betwixt the back edge of your doorbell push and the face of the rock(s) themselves. To keep the button clean and secure, I recommend running a bead of outdoor-advisable silicone effectually the perimeter.
 View in gallery
 Run the silicone around the doorbell button just as though it was caulk.
 View in gallery
 Polish the silicone then wipe off any excess with your fingers.
 View in gallery
 Let the silicone dry out thoroughly.
 View in gallery
 Congratulations! Yous may have finished your doorbell push button install much sooner than I did, but it feels good whenever y'all terminate the job. Doesn't this super simple upgrade make the entire doorbell feel meliorate in every possible way?
 View in gallery
 I like the LED light feature on this push button also, although information technology's certainly not required for an impactful doorbell button bandy.
Source: https://www.homedit.com/doorbell-button/
0 Response to "How to Replace a Doorbell Button – a Fast and Easy DIY Project"
Post a Comment